How to Draw a Roller Coaster A Step-by-Step Manual
Going to an amusement park or carnival can be one of the most fun outings you can experience! Usually, these events choice has some fun lifts to go on. Of all these attractions, a roller coaster is one of the most exciting you can take part in, and they manage to be fun and scary simultaneously.
It can be fun to ride one. You can also have a good time learning how to draw a roller coaster. However, its complex structure can make a drawing difficult, but this guide will show you how. Excitingly fun time working on this step-by-step guide on how to draw a roller coaster!
Also read: house drawing
How to Draw a Roller Coaster – Let’s Get Initiated!
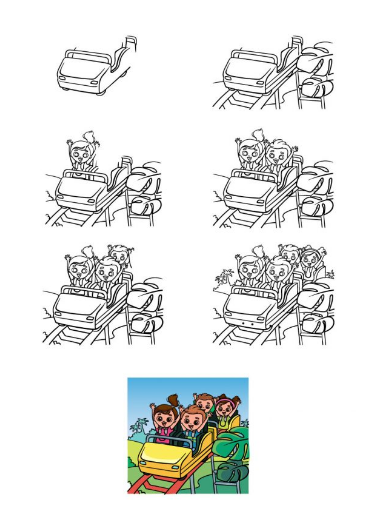
Step 1
In this guide on how to draw a roller coaster, we will draw a roller coaster car with four people sitting on it. For this first step, we’ll remove the vehicle, to begin with. This car has a few different components, so taking it easy and following the guide closely will be the best way to draw this car.
You can use a combination of straight and curved lines to remove the vehicle’s body, and there will also be a safety bar at the front. There will be a space on top of the car where we will draw people in the next few steps.
Step 2
This second part of the roller coaster drawing will also include a lot of detail to draw, so this is another one where you’ll want to go slow and follow the guide. First, you can use some curved lines for the roller track. Roller coaster.
These tracks will also have bars that descend vertically towards the poles that hold the trails up in the air. Then we’ll draw some background details, like some big leaves next to the roller coaster. You can also add some pieces of your own before resuming!
Step 3
Now that you have the roller coaster car drawn, in the next step of our guide on removing a roller coaster, we will mark the first person to get on it. The first person will be a little girl, and like everyone in the car, they will be drawn in a fun cartoon style. You can also change the type of people on the roller coaster.
Step 4
In this fourth step of drawing the roller coaster, you will add another person to the image. The next will be a little boy. You also need to remove the restraints that hold them in the car.
Step 5
We will continue to draw more children in the car for this step of our guide on how to remove a roller coaster. This little boy will be in the next row and sitting in another section of the car that we will draw in the next step. There will be another child sitting next to him, and you will also mark the beginning of his hands in this step.
Step 6
It’s almost time to add some fantastic colors to the roller coaster drawing, but first, we have a few more details and elements to add. As mentioned in the previous step, we will draw one more boy on the roller coaster. Using some curved lines to create the second roller coaster car that you will sit on. Once you’ve drawn that second car, you can finish off the last kid.
Once you’ve removed the previous child, there are only a few details left to add before you continue. You can add some background details, like trees or mountains, but this is a step where you can also add some details of your own! You can change the background, make the people riding the roller coaster look different, or add some decoration to the sides of the roller coaster. These are just a few ideas you can choose from, so what else can you think of to finish this image?
Step 7
This last step in our guide on drawing a roller coaster will be about adding some fantastic colors to finish it. We used some bright colors for our reference image, but remember, this is just a suggestion. Like the colors we chose, you can use them to replicate the colors in your own drawing, but you can also change them and incorporate any other color or artistic medium you’d like! Make sure to have a lot of fun being creative and see what happens!